
Today post maybe is not a too technical one but I was pushed someday to use Ubuntu desktop, and I had to provide some visual adjustments there. Don’t get me wrong - I love Linux and the Unix ecosystem but … when I saw so un-smooth launcher animations at my PC with 8 cores and AMD RX9 graphics card … it’s just terrible. One day I decided to make my Ubuntu a little more friendly for me, and today I going to show you how you can do the same.
What are we going to do? A little showcase:
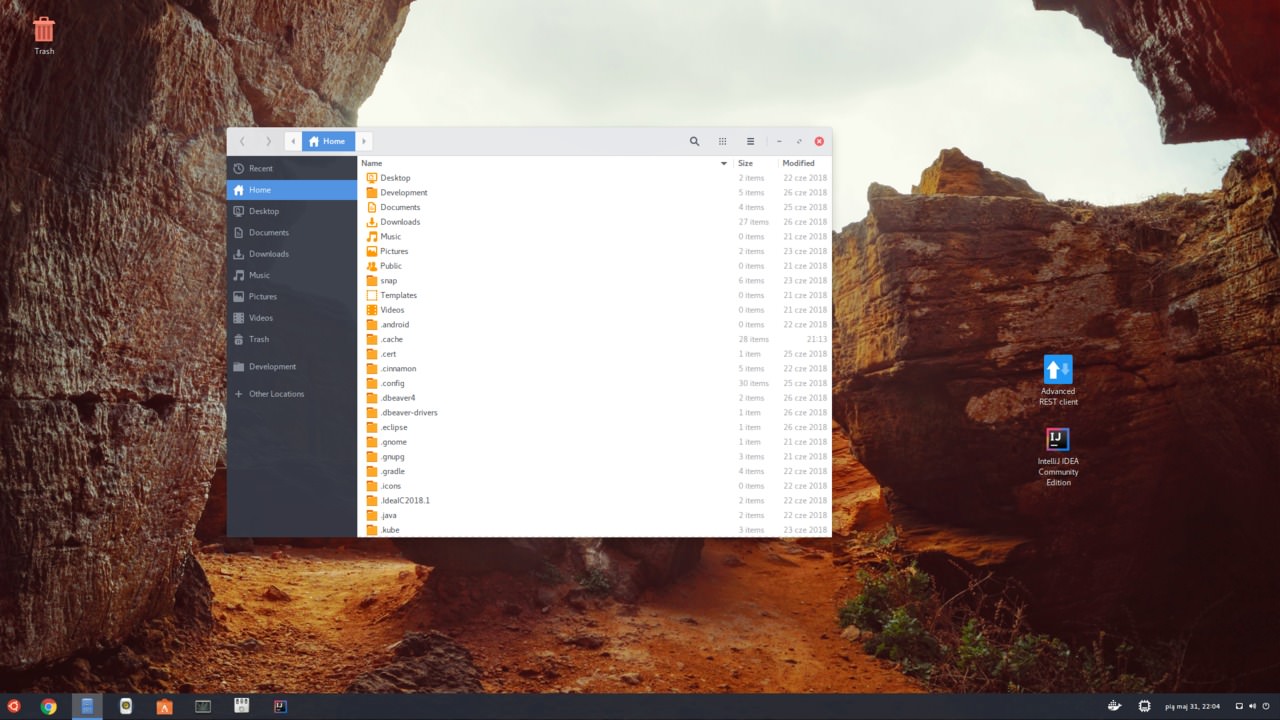

First of all, we are going to use Ubuntu version 18.04 LTS which default desktop environment is Gnome. Why? Because it is no sense to use the legacy version, we would like to be fresh and spice, right? :) So the one requirement to get that works is Gnome - if you have older Ubuntu version you need to install Gnome environment.
If you would like to make it happen - please scroll down to the page bottom where you should find the .zip file with a script which pimps up your Ubuntu desktop.
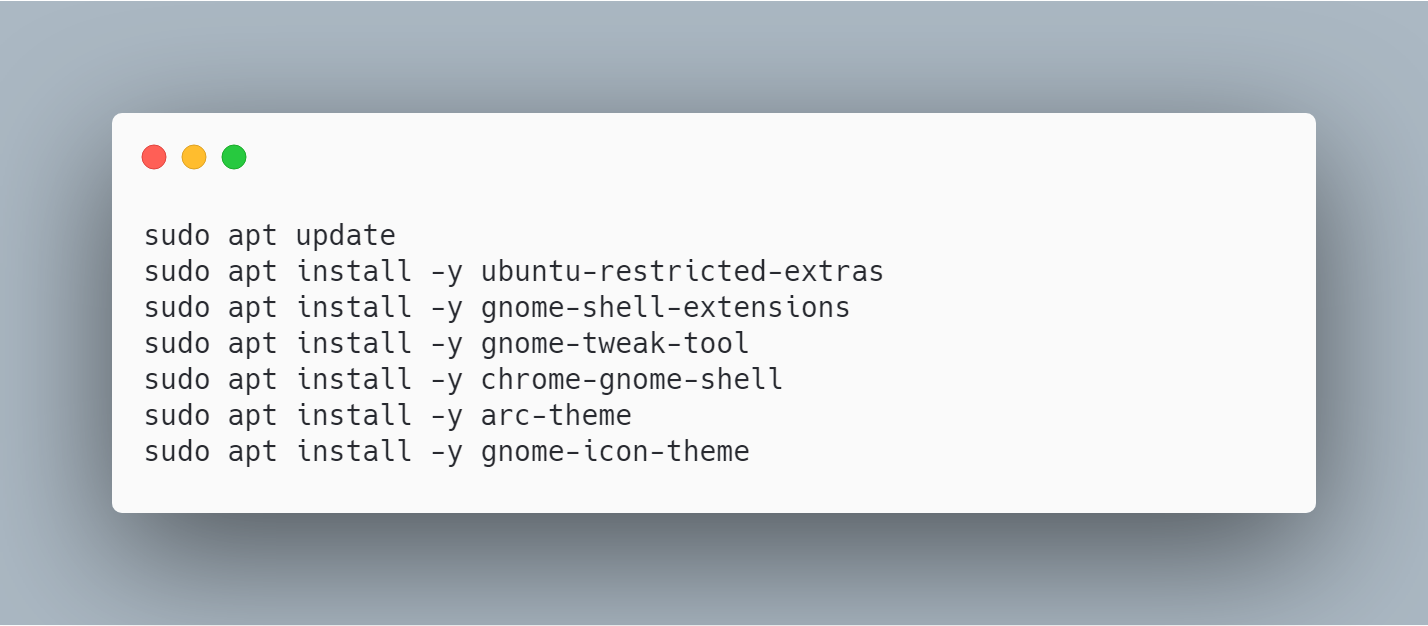
1. Install needed tools
To adjust Ubuntu look face, you need a few tools and visual packs.
- ubuntu-restricted-extras
- gnome-shell-extensions
- gnome-tweak-tool
- chrome-gnome-shell
- arc-theme
- numix-icon-theme
- gnome-icon-theme
2. Gnome extensions
Few gnome extensions which - in my opinion - are very useful
User themes - allows us to use custom shell themes
Dash to panel - my favorite one, it makes good looking bottom panel
Pixel saver - drop windows top bar and move it to the bottom panel
Sound output device choser - good if you are going to use multiple sound devices
Alternate tab - make app tab switching much
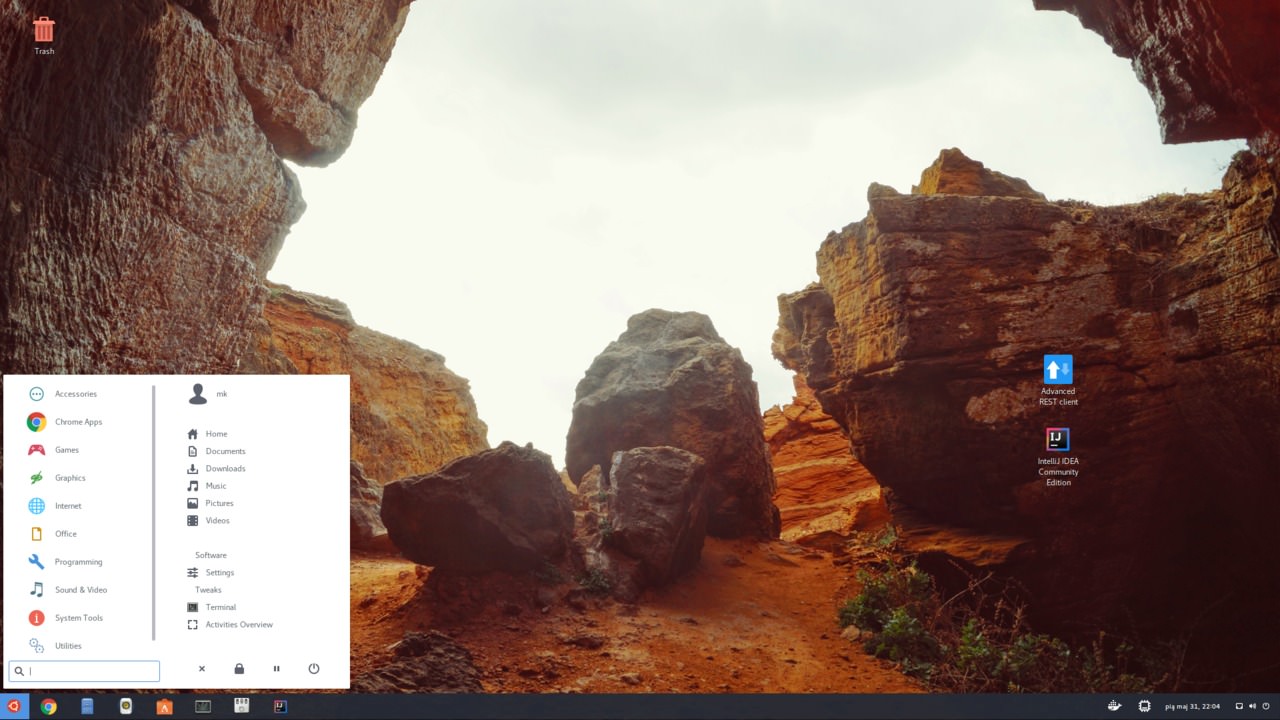
Arc menu - this one is my MUST BE, it is alternative for Gnome application launcher which has terrible performance
Impatience - speed up Gnome animations a little it
Top icon plus - really lovely extensions which show up nice tray icons within the main panel
Removable menu - with this one you can unmount connected drives just from your panel
Docker integration - really helpfully if you wish to use many docker containers during development
Panel OSD - allows us to change notifications window position, for example, to bottom right
3. Gnome tweaking
Now you can use gnome-tweak-tool to adjust our Gnome desktop environment.
I’ve made a few changes.
- window font size adjustments (in my opinion Segue UI font also look suitable for interfaces)
- enable gnome extensions
- change shell theme to
Arc - setup
dash-to-panelpanel to the bottom - move notifications to left
- setup
Arc menuwith the left super key as hotkey trigger and add nice orange Ubuntu icon there’s
You can use following ddconf settings dump:
[org/gnome/settings-daemon/plugins/xsettings]
overrides={'Gtk/ShellShowsAppMenu': <1>}
antialiasing='rgba'
hinting='slight'

[org/gnome/shell]
enabled-extensions=['ubuntu-appindicators@ubuntu.com', 'user-theme@gnome-shell-extensions.gcampax.github.com', 'alternate-tab@gnome-shell-extensions.gcampax.github.com', 'arc-menu@linxgem33.com', 'drive-menu@gnome-shell-extensions.gcampax.github.com', 'TopIcons@phocean.net', 'pixel-saver@deadalnix.me', 'dash-to-panel@jderose9.github.com', 'docker_status@gpouilloux', 'sound-output-device-chooser@kgshank.net', 'impatience@gfxmonk.net', 'panel-osd@berend.de.schouwer.gmail.com']

[org/gnome/shell/extensions/user-theme]
name='Arc'

[org/gnome/shell/extensions/panel-osd]
x-pos=100.0

[org/gnome/shell/extensions/arc-menu]
custom-menu-button-icon='/usr/share/icons/ubuntu-mono-dark/actions/24/package-supported.svg'
custom-menu-button-icon-size=30
menu-hotkey='Super_L'
menu-button-icon='Custom_Icon'

[org/gnome/shell/extensions/dash-to-panel]
show-apps-icon-file=''
group-apps=true
animate-show-apps=false
preview-middle-click-close=true
panel-position='BOTTOM'
peek-mode=true
panel-size=40
peek-mode-opacity=40
location-clock='STATUSLEFT'
show-showdesktop-button=false
group-apps-label-font-color='#dddddd'
group-apps-label-font-size=14
group-apps-underline-unfocused=true
show-show-apps-button=false
show-activities-button=false
window-preview-height=200
show-window-previews-timeout=100
taskbar-position='LEFTPANEL'
window-preview-padding=20
appicon-margin=6
enter-peek-mode-timeout=500
group-apps-use-fixed-width=true
show-appmenu=false
tray-size=10
window-preview-show-title=true
isolate-workspaces=false
window-preview-width=350

[org/gnome/desktop/interface]
text-scaling-factor=1.0
font-name='Ubuntu Regular 9'
gtk-im-module='gtk-im-context-simple'
toolkit-accessibility=false
monospace-font-name='Ubuntu Mono Regular 11'
enable-animations=true

[org/gnome/desktop/wm/preferences]
button-layout=':appmenu,minimize,maximize,close'
titlebar-font='Ubuntu Bold 9'

[org/gnome/desktop/wm/keybindings]
panel-main-menu=['Super_L']
To use it you need to put it somewhere at your filesystem and execute command like that one:
$ dconf load / < dconf_config.config4. The script
You can download the script which make all of those changes by clicking here. Only one mention if it wouldn’t work please make sure that scripts has execution permissions.
$ chmod+x gnomeshell-extension-manage
$ chmod+x ubuntu-nice-look.sh
$ sh ubuntu-nice-look.sh
5. The missing part
There is one more thing which I don’t include in the script: Gnome applications, cursor and icons themes. There are two good options.
- Set icons and application theme to numix - it is nice. You can install it as follow:
$ sudo add-apt-repository ppa:numix/ppa
$ sudo apt update
$ sudo apt install -y numix-icon-theme- My choice is the new
Yarutheme. If you use Ubuntu 18.10+, you have alreadyYaruas default theme but if you are not - you can install communittheme.
sudo snap install communitthemethen you should go to Gnome tweaks tool > Appearance and chose Communittheme as applications, cursor, and icons theme.